Move a robot
Move a robot
This guide walks through creating a Skill called wiggle_joint that moves a
single joint back and forth using the ICON API. It does not
check for collisions, and it is not meant for use in production. It is provided
as an example to demonstrate using realtime ICON Actions and
non-realtime Reactions. Please consult the
ICON API Guide for additional documentation on the ICON
concepts used by the Skill.
Are you sure you need a custom Skill to move your robot? The Intrinsic platform
already provides a comprehensive one called move_robot. You should prefer to
use it in your Solutions.
Setup
Before you can follow this guide you must create a Solution with a robot, and you must select it as the target Solution in your development environment. Follow the guides for setting up your development environment and making your first Skill to learn how to do that.
There are two execution modes: "Preview" and "Full". In "Preview" mode only the
preview method is called. The preview method returns what a Skill would do
if executed, without actually executing it. Our example Skill only implements
the execute method, so you must set your Solution's execution mode to "Full".

Create a new Skill
Create a new C++ Skill in your development environment following the
say_skill
example as a template and rename it appropriately. We will use the name
wiggle_joint for the new Skill in the rest of the guide.
Give it the identifier com.example.wiggle_joint.
The Skill needs to include headers and depend on Bazel targets from the Intrinsic SDK. Let's put those in the Skill now so the rest of the guide can focus on how to move the robot.
First add the following include directives to wiggle_joint/wiggle_joint.cc.
- C++
#include "intrinsic/icon/actions/point_to_point_move_info.h"
#include "intrinsic/icon/cc_client/client.h"
#include "intrinsic/icon/cc_client/client_utils.h"
#include "intrinsic/icon/cc_client/session.h"
#include "intrinsic/icon/equipment/channel_factory.h"
#include "intrinsic/icon/equipment/equipment_utils.h"
Next add the following using directives to wiggle_joint/wiggle_joint.cc.
- C++
using ::intrinsic_proto::icon::PartJointState;
using ::intrinsic_proto::icon::PartStatus;

using ::intrinsic::icon::Action;
using ::intrinsic::icon::ActionDescriptor;
using ::intrinsic::icon::ActionInstanceId;
using ::intrinsic::icon::ConnectToIconEquipment;
using ::intrinsic::icon::CreatePointToPointMoveFixedParams;
using ::intrinsic::icon::DefaultChannelFactory;
using ::intrinsic::icon::Icon2ResourceSelectorBuilder;
using ::intrinsic::icon::IconEquipment;
using ::intrinsic::icon::IsDone;
using ::intrinsic::icon::IsGreaterThanOrEqual;
using ::intrinsic::icon::IsTrue;
using ::intrinsic::icon::PointToPointMoveInfo;
using ::intrinsic::icon::ReactionDescriptor;
using ::intrinsic::skills::EquipmentPack;

using IconClient = ::intrinsic::icon::Client;
using IconSession = ::intrinsic::icon::Session;
Next delete these lines from the Skill's execute method defined in
wiggle_joint/wiggle_joint.cc file, as the parameters for the Skill no longer
have a "text" parameter.
// Log the text provided.
LOG(INFO) << params.text();
Finally add the following Bazel labels to the deps argument of the
cc_library() rule named "wiggle_joint" in wiggle_joint/BUILD.
        "@ai_intrinsic_sdks//intrinsic/icon/actions:point_to_point_move_info",
        "@ai_intrinsic_sdks//intrinsic/icon/cc_client:client",
        "@ai_intrinsic_sdks//intrinsic/icon/cc_client:client_utils",
        "@ai_intrinsic_sdks//intrinsic/icon/cc_client:session",
        "@ai_intrinsic_sdks//intrinsic/icon/equipment:channel_factory",
        "@ai_intrinsic_sdks//intrinsic/icon/equipment:equipment_utils",
"@ai_intrinsic_sdks//intrinsic/skills/cc:equipment_pack",
Parameters and outputs
The first step when creating a Skill is to decide on its parameters and outputs. These are defined by protobuf messages.
Let's make this Skill accept one parameter for the index of the joint to wiggle. It does not need to output anything, so no output message needs to be defined.
Put the following into the file wiggle_joint/wiggle_joint.proto to define the
WiggleJointParams message.
syntax = "proto3";

package com.example;

message WiggleJointParams {
  int32 joint_number = 1;
}
Make sure the Skill manifest includes the following lines so Flowstate knows this message is used for the Skill's parameters.
parameter {
  message_full_name: "com.example.WiggleJointParams"
}
Equipment
The Skill requires a robot with a position controlled Part.
Skills can get access to robots through the equipment interface. First the Skill
needs a name for the equipment. This is meant to be human readable as it shows
in the user interface in the Skill's "Parameters" tab. Define it in
wiggle_joint/wiggle_joint.h as a constant on the class itself.
- C++
static constexpr char kRobotSlot[] = "robot";
Next the Skill must declare the kind of equipment it needs. This is done by
adding the equipment types to the Skill's manifest. Add the following block
to the dependencies block of your Skill's manifest file.
required_equipment {
    key: "robot"
    value {
      capability_names: "Icon2Connection"
      capability_names: "Icon2PositionPart"
    }
}
Flowstate looks at equipment descriptors and provides Skills with equipment
matching them. Add the following to your Skill's Execute() method after
parameter parsing. It makes the Skill get a handle to the robot that Flowstate
provides.
- C++
  const EquipmentPack equipment_pack = context.equipment();
  INTR_ASSIGN_OR_RETURN(const auto equipment, equipment_pack.GetHandle(kRobotSlot));
Connect to the robot
The Skill knows what robot to use, but it needs to connect to it before it can
use it. This is done by using an ICON Client. Add the following
to the Execute() method of your Skill.
- C++
  INTR_ASSIGN_OR_RETURN(IconEquipment icon_equipment,
    ConnectToIconEquipment(equipment_pack, kRobotSlot, DefaultChannelFactory()));
  IconClient icon_client(icon_equipment.channel);
Now that the Skill is connected to the robot through the ICON client, let's get some more information about the robot. The Skill needs to know how many joints the robot has and what their current positions are.
- C++
  INTR_ASSIGN_OR_RETURN(auto robot_config, icon_client.GetConfig());

  const std::string part_name = icon_equipment.position_part_name.value();
  INTR_ASSIGN_OR_RETURN(intrinsic_proto::icon::GenericPartConfig part_config,
                   robot_config.GetGenericPartConfig(part_name));

  INTR_ASSIGN_OR_RETURN(const PartStatus part_status,
                   icon_client.GetSinglePartStatus(part_name));
This gives the Skill enough information to make sure the joint number it is
given is valid. Add this to the Skill's Execute() function to validate the
parameter.
- C++
  if (
    params.joint_number() < 0 ||
    params.joint_number() >= part_status.joint_states_size()) {

    return absl::FailedPreconditionError(absl::StrCat(
      "Joint ", params.joint_number(), " does not exist on: ",
      equipment.name()));
  }
Calculate goal positions
The Skill needs to decide where it wants the robot to move to before it can move it. Let's make our Skill move a joint five degrees in one direction followed by moving it back to the position it found it in.
The first goal position is all joints at their current positions with one joint
rotated 5 degrees counter clockwise. The second goal position is all joints back
at their original positions. The target velocities of all joints are zero at
both goals. Add the following to your skill's Execute() function to calculate
these positions and velocities.
- C++
  const double five_degrees = 0.0872665;  // Radians
  const double joint_target_pose =
      part_status.joint_states(
        params.joint_number()).position_sensed() + five_degrees;

  std::vector<double> original_positions;
  std::vector<double> first_goal_positions;
  std::vector<double> zero_velocity;
  for (size_t i = 0; i < part_status.joint_states_size(); ++i) {
      const double cur_pos = part_status.joint_states(i).position_sensed();
      if (params.joint_number() == i) {
          first_goal_positions.push_back(joint_target_pose);
      } else {
          first_goal_positions.push_back(cur_pos);
      }
      original_positions.push_back(cur_pos);
      zero_velocity.push_back(0);
  }
Describe movement with ICON Actions
The Skill has its movement goals, but the robot needs to know about them too.
ICON Actions are used to describe and command movements on a
robot. The Skill needs an ICON Session to use them, so let's
make it start one in its Execute() function.
- C++
  // Start an icon session
  INTR_ASSIGN_OR_RETURN(
    std::unique_ptr<IconSession> icon_session,
    IconSession::Start(icon_equipment.channel, {std::string(part_name)}));
ICON Actions have numeric identifiers. These need to be referred to a few times,
so define them as constants in the Execute() function.
- C++
  const ActionInstanceId kFirstMoveId(1);
  const ActionInstanceId kSecondMoveId(2);
  const double kTimeoutSeconds = 2;
ICON Actions are described with descriptors. Add the following to your Skill's
Execute() function to describe the first action.
- C++
  ActionDescriptor first_move =
    ActionDescriptor(PointToPointMoveInfo::kActionTypeName,
                            kFirstMoveId, part_name)
        .WithFixedParams(CreatePointToPointMoveFixedParams(
            first_goal_positions, zero_velocity))
        .WithReaction(
            ReactionDescriptor(IsDone())
            .WithRealtimeActionOnCondition(kSecondMoveId))
        .WithReaction(
            ReactionDescriptor(
                IsGreaterThanOrEqual(
                          PointToPointMoveInfo::kSetpointDoneForSeconds,
                          kTimeoutSeconds))
            // This nonrealtime callback prints a message if the
            // joint motion fails to settle within a timeout.
            .WithWatcherOnCondition([&icon_session]() {
              LOG(ERROR) << "Failed to reach Goal";
              icon_session->QuitWatcherLoop();
            }));
Let's go through each part of the descriptor to understand it better. The first part describes a point to point move. It has an identifier and a reference to the robot to move. It is given the goal positions and velocities of the first goal location.
- C++
    ActionDescriptor(PointToPointMoveInfo::kActionTypeName,
                            kFirstMoveId, part_name)
        .WithFixedParams(CreatePointToPointMoveFixedParams(
            first_goal_positions, zero_velocity))
The next part of the descriptor says to execute the second action when the first one is done.
- C++
        .WithReaction(
            ReactionDescriptor(IsDone())
            .WithRealtimeActionOnCondition(kSecondMoveId))
The last part of the descriptor says to call the given callback if it takes too long to complete. It is important to note that the actions that move the robot run in a realtime manner. The callbacks given as reactions run in a non-realtime manner. Logging to the console doesn't block the robot's control loop.
- C++
        .WithReaction(
            ReactionDescriptor(
                IsGreaterThanOrEqual(
                          PointToPointMoveInfo::kSetpointDoneForSeconds,
                          kTimeoutSeconds))
            // This nonrealtime callback prints a message if the
            // joint motion fails to settle within a timeout.
            .WithWatcherOnCondition([&icon_session]() {
              LOG(ERROR) << "Failed to reach Goal";
              icon_session->QuitWatcherLoop();
            }));
The second ICON action is similar to the first. Add the following to your
Skill's Execute() function.
- C++
  ActionDescriptor second_move =
    ActionDescriptor(PointToPointMoveInfo::kActionTypeName,
                            kSecondMoveId, part_name)
        .WithFixedParams(CreatePointToPointMoveFixedParams(
            original_positions, zero_velocity))
        .WithReaction(
            ReactionDescriptor(
                IsTrue(PointToPointMoveInfo::kIsSettled))
            .WithWatcherOnCondition([&icon_session]() {
                LOG(INFO) << "Finished moving joints.";
                icon_session->QuitWatcherLoop();
              }))
        .WithReaction(
            ReactionDescriptor(
                IsGreaterThanOrEqual(
                    PointToPointMoveInfo::kSetpointDoneForSeconds,
                    kTimeoutSeconds))
            // This nonrealtime callback prints a message if the
            // joint motion fails to settle within a timeout.
            .WithWatcherOnCondition([&icon_session]() {
              LOG(ERROR) << "Failed to reach Goal";
              icon_session->QuitWatcherLoop();
            }));
The second action is also a point to point move, but this time it uses the original joint positions as the goal. Its reactions are also different from the first. It prints an informational message when the robot settles at the goal position and velocity. If that takes to long then it instead prints an error message.
Move the robot
The Skill has everything it needs to move a robot. It's now time to move it. First add the ICON action descriptors the open session.
- C++
  INTR_ASSIGN_OR_RETURN(
    auto actions,
    icon_session->AddActions({first_move, second_move}));
Then start the first action and run a watcher loop. This is what actually
triggers the robot motion. The watcher loop waits for
reactions and executes the non-realtime callbacks. Add the following to the
Execute() function.
- C++
  LOG(INFO) << "Starting Wiggle.";
  INTR_RETURN_IF_ERROR(
    icon_session->StartActions({actions.front()}));
  INTR_RETURN_IF_ERROR(icon_session->RunWatcherLoop());
  LOG(INFO) << "Finished Wiggle.";
Run the Skill
This Skill is ready to be tested. Build and install the Skill into your
Solution. Next create a process with an enable_motion Skill followed your
wiggle_joint Skill.
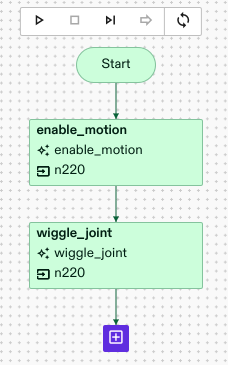
Enter a number for a joint to use in your Skill's parameters and start the Process. You should see a joint wiggle.
Source code
The full source code for this example is available in the intrinsic-ai/sdk-examples repository
Debugging tools
The Motion Planning inspector is a tool that can be used for debugging the move robot Skill. Detailed instructions on how to use this tool can be found here: motion-planning-inspector.